When it comes to publishing your apps at a store, it’s almost always more complicated than it seems. At one point, I was publishing about 5 to 10 applications per day so I would say that I am very familiar with the Windows 8 application submission process as well as common reasons for rejection. In the hopes of saving people as much time as possible, here is a step-by-step guide for publishing an app to the Windows Store!
-
Have all your required items ready
- .appxupload file – It is a file generated from your Windows 8 application after you have go through the certification process via Visual Studio
- 4 to 6 screen shots of your Windows 8 application – The screen shots should highlight the pages and some features of your application
- A privacy policy page – This is an important step that a lot of people don’t know about. Most app stores require a privacy policy for your app in the form of a link. Overall the privacy policy should include the following traits: Network-capable, Sharing Services, Location Services, Collection and Use, Analytic Data and Contact Info. Here is an example of a basic privacy policy that we use often and that has worked in the past.
-
Misc (~ 10 – 20 mins)
- Reserve Your App Name – it has to be unique
- Selling Detail
Select your pricing tier and which price to sell it for. Most app stores have different pricing tiers that you can choose from. Be sure to research these tiers thoroughly before making your decision. It also doesn’t hurt to have a look at what your competitors are charging.
If you want to take your application off the market after you publish, create a release to make it not available in all market.
- Services
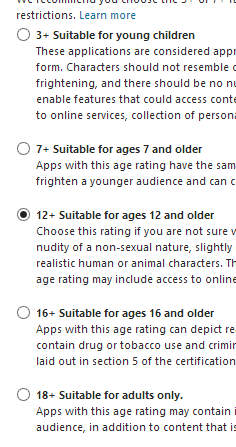
This is where you add your Windows Azure Mobile Services or In-app offers. If you don’t need to do anything at this step, then feel free to skip it by pressing save! - Age Setting – Does your app contain content that is better suited to a certain age group? If so, then make sure to pay special attention to this section as an incorrect age setting can easily lead to your app being rejected.

- Crytography
You know who are you if you are using Crytography, so mark it accordingly
- Package
Upload your .appxupload file by dragging and dropping it into the provided box
-
Description (~30 mins)
Although it may seem unimportant, most app stores place great value on the app description when deciding whether or not to approve it. The description should describe the functionality of your app as well as the benefit that it provides to users. After numerous failed attempts , I’ve come up with a few simple templates that almost always work, but feel free to try your own. Also don’t forget about the importance your description will have to your customers. The app description is usually all a potential customer will read before making a purchase decision, so make sure your description includes everything below:
This application, [application name] is about [your topic] and provides [this, this and that function] to users or This application, [application name], enables users to [do this, this and that]. Another good idea would be to look at the descriptions of apps similar to yours that have already been published in the Windows Store.

You also need to upload your Screen Shots, enter your App Features, Keywords, Copy Rights, Privacy Policy, Contact Info, Website -
Notes to testers (~ 1 min)
If your Application need an test account to access certain feature, please provide a test account and provide clear instructions how the tester can test your application.
Some common error when you are publishing your app
- Make sure all the functions are working correctly
- An incorrect Privacy Policy, please look at the example here.
- A promotion description won’t help you pass the certification process, the description should be the function of the application or what values does it provide to users
- If your content if not for young child, you have to set your age limit correctly
Once you have everything ready from step one, the whole process should take around 40 minutes. After that, it takes Microsoft 3-5 business days to approve your app and have it published in the Store. Alternatively you can use IdeaPress and we’ll do all of this for you. With a simplified app creation that requires no coding, you can turn your WordPress website into an app in minutes! We will handle all of the above steps for you including troubleshooting if the app is rejected. Our price also includes the cost of a Windows Store developer account. Try IdeaPress before October 5th and you can have your app created and published into the Windows Store for a discounted price of only $99. We’ll even throw in an Android version of your app for FREE!
Feel free to contact me if you have any additional questions and I’ll be happy to help. Happy coding. =)
By Michael Siu

